Virtual Home Lab with Hyper-V (Part 1)
Hey Readers!
This is my first time writing a tech guide post. So I hope you guys would spare me on my grammars or if the content is not properly organized.
Let’s start!
Part 1 of 3 - Creating and setting up the Hyper-V Components
This series of post serves to help the future me or anyone else who would like to set up a virtualised home lab.
This guide consists of 3 parts to setup a virtualised home lab. The purpose of each part is shown below.
- Part 1 (this) - Creating and setting up the Hyper-V Components
- Part 2 - VLAN Configuration
- Part 3 - Setting up Internet and allow traffic between VLANs
In this part, we will be covering the following:
- Why this homelab?
- The idea
- Creating the Hyper-V Components
- Creating the Hyper-V Virtual Switches
- Creating the Firewall VM and installation of the pfsense
- Creating the Client VMs
Prerequisites
- Windows 10 PC with Hyper-V Enabled
For going through this lab, I would recommended to have at least 8 virtual cores, 16GB RAM and 50GB disk storage.
Why?
A virtualised home lab would be useful in the event that one need to download vulnerable images for practicing pentest skills. At the same time provide a level of isolation for the vulnerable images. We can choose to use cloud technologies for this but it would incur some costs. Thus, setting up in a virtualised home lab environment would help to save some of the costs incurred.
The idea
The objective of this setup is to isolate the virtual machines created in our lab from our host. We will only allow web traffic to leave the network isolated network. In the event of a malware infection, we want to reduce the chance of worms propagating from our VMs to our host. However, this setup would not block be able to block a malware communicating back to the C2 server via HTTP/HTTPS (yet). But we can add additional controls to reduce the risk of it happening.
So now let us first take a look at the end state of our network. 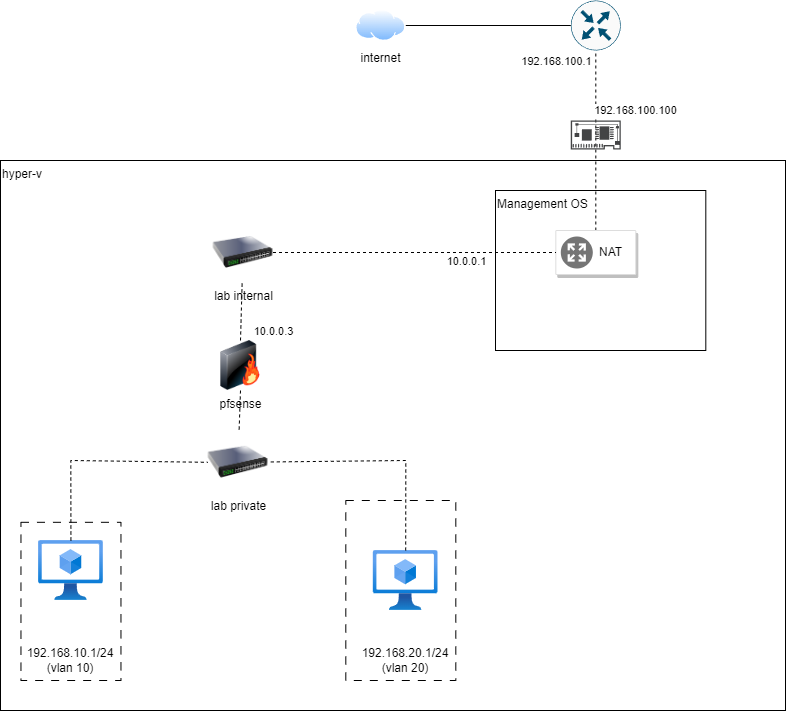
This would allow us to:
- Add additional VLANs
- Add additional VMs into a VLAN
- Allow/Deny traffic between the VLANs
- Internal machines are able to access the internet
- Blocking of ingress/egress traffic using the pfSense firewall
A short explanation for the above setup:
192.168.10.0/24network is a trusted network. We can put our VMs such as a kali/parrot box here.192.168.20.0/24network is a “sandbox” network and untrusted. We can put VMs downloaded from Vulnhub here. This network will be restricted to access any networks.10.0.0.0/24is the network connecting the WAN interface of our firewall and the management host.192.168.100.0/24is the local network of the management host. This network should be able to access internet.
The components
We will be creating the virtual components
- 3x VM
- 1x router/firewall
- 2x client
- 2x Hyper-V Switch
Creating the Hyper-V Components
For the end devices, feel free to use any ISO image. I will be using Windows 10 image. If you already have existing Windows VM, you can use them too. For the router/firewall, we will be using pfsense 2.7.1 (latest at the time of writing). However, you can use the updated image from here and extract the ISO image.
Creating the Virtual Switches
We will start by creating 1 internal and 1 private switch.
- Launch Hyper-V Manager as Administrator.
- On the left panel, look for Hyper-V Manager and select your Hostname under it. An Actions panel will appear on the right of the Hyper-V Manager window.
- In Actions panel, click on Virtual Switch Manager. A Virtual Switch Manager popup window would appear.
- In the Virtual Switch Manager popup window, under Virtual Switches, select New virtual network switch.
- The option of Create Virtual Switch would appear. Select Internal and click Create Virtual Switch.
- A switch would be created with the default name of “New Virtual Switch”. We will change the name of the switch.
For the name of the switch we will call it
Lab Internal. Ensure the connection type is set to Internal Network. It should look something like below.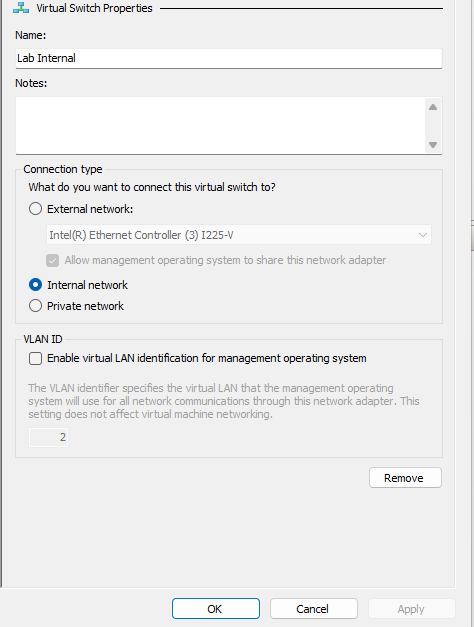
- Click on Apply.
- We will create another private switch. To do so, repeat the same steps 4 to 8. But this time, select the Private option instead. Name the switch as
Lab Private. Ensure you have the 2 switches that you created and the settings are correct.
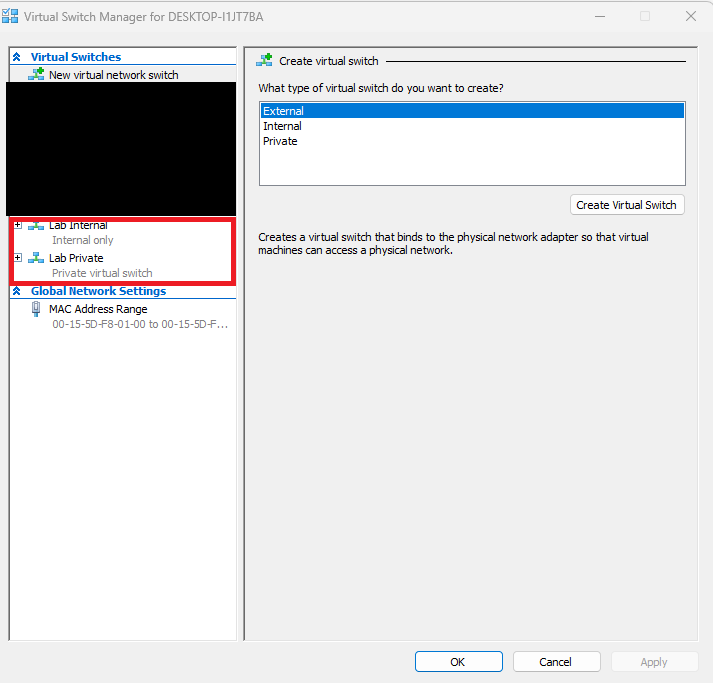
- Click on Ok to close the Virtual Switch Manager window after you have created both switches.
Creating the pfsense firewall
Next, we will be creating the pfsense firewall VM.
- In the Actions panel at the right, select New > Virtual Machine . A New Virtual Machine Wizard window will appear.
Using the wizard, fill in the below settings to proceed with the creation of the VM .
Hyper-V VM Settings for pfsense firewall
1
2
3
4
5
6
 Name: Firewall
 Generation: 1
 Startup Memory: 2048 MB
 Connection: Not Connected
 Create a Virtual Hard Disk > Size: 10GB
 Install an Operating System from a bootable CD/DVD-ROM > Image file: Select the PFSense ISO downloaded previously
- Review the settings in the Summary window and click Finish to create the VM.
Installing pfsense OS
We will power on the Firewall VM and install the pfsense OS.
- In the Hyper-V Manager window, double click on
Firewallin the Virtual Machines list. The VM console window would appear. - To start the VM, click on Start in the middle of the VM console window or select Start from the Action menu of the VM console window.
- At the Welcome page, select Install.
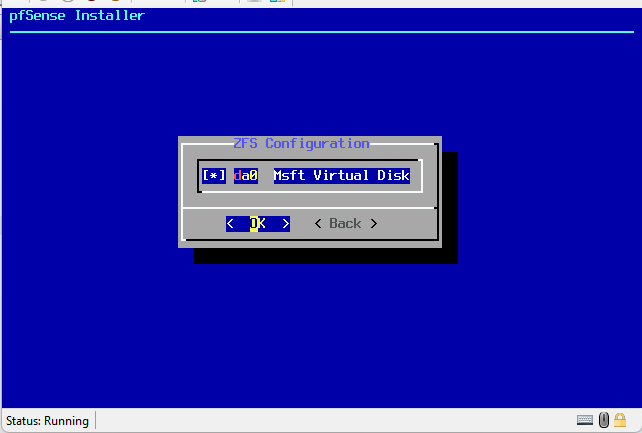
- In the partitioning page, choose your partitioning choice. I selected Auto (ZFS).
- In the Configure Options, select Install.
In the page to choose a disk, use Spacebar to select the option and click enter to proceed.
- Select yes and proceed with the installation. Reboot after the installation has completed.
Adding a network interface
After the reboot, we will need to shut down the Firewall to add an extra network interface.
- In the Hyper-V manager window, turn off the firewall by right clicking on the firewall and click Turn Off.
- Open the VM settings window by right clicking on the firewall and click Settings. The Settings popup window would appear.
- In the popup window, select Add Hardware. An Add Hardware panel would appear on the right.
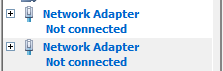
- Select Network Adapter and click Add.
In the same window, under Hardware on the left panel, we should be able to see that we have 2 Network Adapters as shown below.
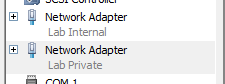
Select the first Network Adaptor by clicking on it. The Network Adapter options would appear on the right. Set the Virtual Switch to Lab Internal. For the second Network Adaptor, set it to Lab Private.
We will power up our firewall next, but first we will eject the ISO disc. In the Hardware Panel, select IDE Controller 1 > DVD Drive and set None in the Media option. Click on Ok to close the settings window and power up the firewall.
Configuring the firewall
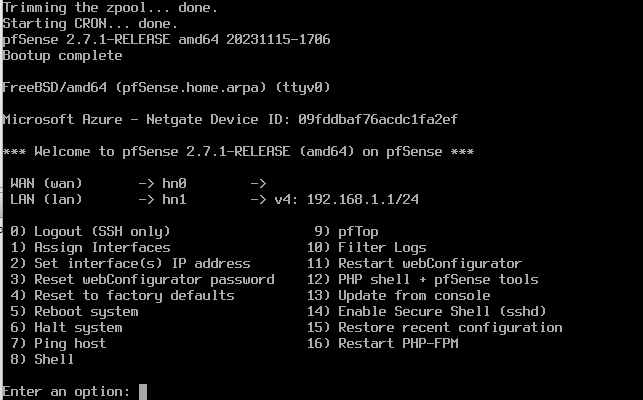
After the firewall has been started, it will ask for a series of questions to configure the firewall network interfaces. Use keyboard to input the options provided.
- When prompted to setup vlans, we will not configure it for now so hit n and enter.
- When prompted to select WAN interface name, use hn0.
- When prompted to select LAN interface name, use hn1
- In the confirmation of interfaces, ensure WAN is point to HN0 and LAN is pointing to hn1 before proceeding.
It will take awhile for the pfSense to configure its firewall, but upon completion, we will be greeted with a page to select options.
We will keep this VM running while we proceed to create the other clients.
Creating the Windows Clients
For the client OS, it can be of any OS of your choice. Thus, I will briefly cover through the installation for the Windows VM.
We will create 2 VMs with the name Windows 10 (vlan10) and Windows 10 (vlan20). Download the Windows 10 ISO image from Microsoft and proceed with the installation of the OS. For the creation of the VM in Hyper-V, use the settings below or feel free to change the any of the settings if needed.
VM 1 - Windows 10 (vlan20)
1
2
3
4
5
6
Name: Windows 10 (vlan10)
Generation: 1
Memory: 4096MB
Connection: Lab Private
Virtual Hard Disk Size: 20GB
Installation Source: Windows 10 ISO image
VM 2 - Windows 10 (vlan20)
1
2
3
4
5
6
Name: Windows 10 (vlan20)
Generation: 1
Memory: 4096MB
Connection: Lab Private
Virtual Hard Disk Size: 20GB
Installation Source: Windows 10 ISO image
If you already have a VM running, add a network adapter to the VM via the VM’s settings window and connect it to
Lab Private. Just remember which client is the one that you want it to be in either of the VLANs!
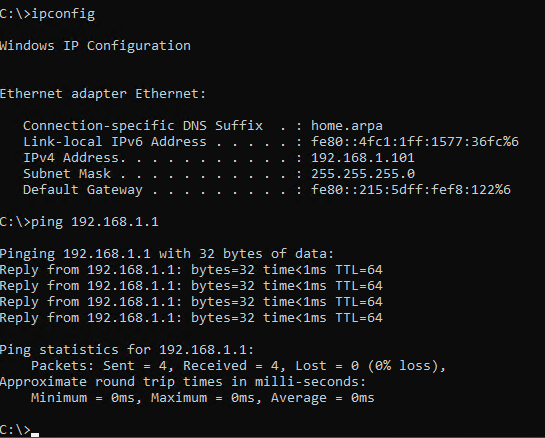
Once both Windows VMs have been set up, you can see that we do not have any Internet but we have been assigned an IP address. This is because the DHCP service is enabled by default in pfsense and it has issued the VMs IP addresses.
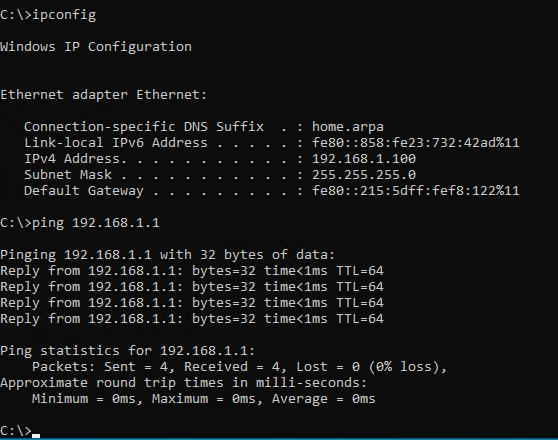
We can see that the other VM also has connectivity to the pfsense firewall.
We have finish setting up the components for our network. In the next part of this guide, we will proceed to set up the VLANs.