Virtual Home Lab with Hyper-V (Part 3)
Part 3 of 3 - Setting up Internet and allow traffic between VLANs
This guide is part 3 of a 3 part series for setting up a virtualised home lab with Hyper-V.
In this part, we will be covering the following:
- Adding firewall rules to allow clients in VLAN10 to reach clients in VLAN20
- Traffic allowed from VLAN 10 to VLAN 20 can only be HTTP/HTTPS and ICMP traffic
- Configuring NAT on our management host to translate internal traffic
- Adding firewall rules to allow clients in specific VLANs (VLAN 10) can access the internet
- Restricting access to anywhere for VLAN20 clients
Adding firewall rules to allow clients in VLAN10 to reach clients in VLAN20
Before we start, let’s allow ICMP ECHO on the Windows Defender firewall on the Windows client in VLAN20. You may choose to skip this step, but it would be difficult to troubleshoot in case you meet with any error.
If you are on a *nix based client or you have used a VM that allows ICMP ECHO from another network, you may choose to skip this to adding of firewall rules.
Allowing ICMP ECHO on Windows Client
- On the VLAN20 windows client, go to Windows Defender Firewall > Advanced Settings.
- Right click on the Inbound Rules at the right panel and select New Rule….
-
Use the following setting to create the rule to allow ICMP ping. For settings not listed, you can use the defaults.
1
2
3

 Rule Type: Custom
 Protocol Type: ICMPv4
 Name: Allow Ping For Now
Let’s check if the ping is working from our Firewall. Go to the Firewall VM, choose option 8 and you will get a command line input.
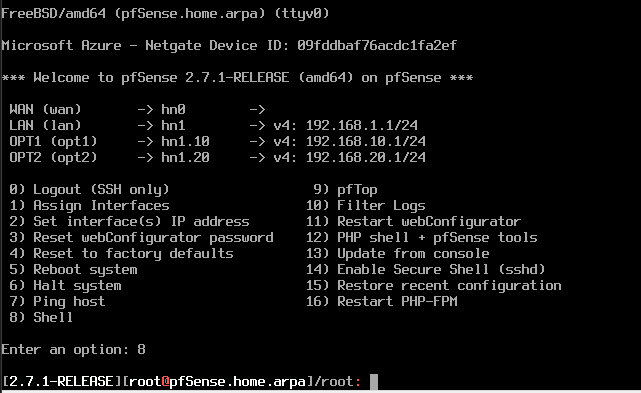
- From the command line input, run a ping test to ensure that you can ping it. You should be able to ping it.
1

ping -c 2 192.168.20.100
Do note that the IP above may be different in your case.
Adding of firewall rules on pfsense
In the previous section, we did a ping test from Firewall to the Windows 10 (vlan20) client. If we try to ping Windows 10 (vlan20) from our Windows 10 (vlan10), we will not be able to do so. This is because there are no rules in Firewall currently allow network traffic in/out for both VLAN10 and VLAN20. (With the exception of the rule we created in part 2 to allow VLAN10 to access web configurator.)
VLAN10 Client pinging VLAN20
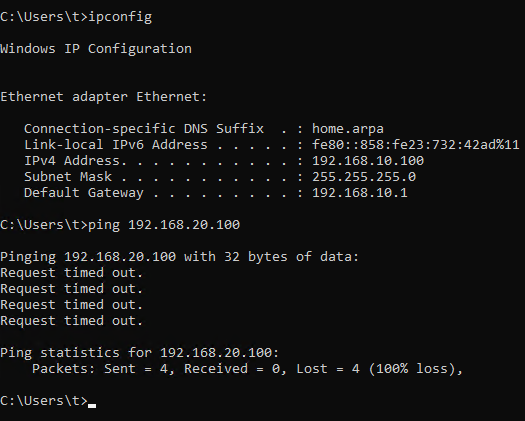
Thus, we will now create a rule to allow any clients in VLAN10 to send any ICMP traffic to clients in VLAN20.
- Access web configurator from
Windows 10 (vlan10)and go to Firewall > Rules > OPT1. - Click on any of the Add button to add a rule with the following settings.
1
2
3
4
5

 Address Family: IPv4
 Protocol: ICMP
 ICMP Subtypes: any
 Source: OPT1 Subnets
 Destination: OPT2 Subnets
Note: The rule above allows any types of ICMP traffic from OPT1 subnets to OPT2 subnets only.
- Save the rule and apply changes.
-
Now go back to
Windows 10 (vlan20), we will issue the ping command again. We are able to ping the client in VLAN20 now.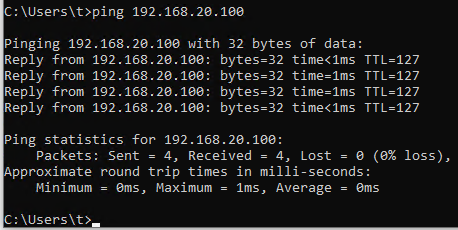
- For allowing of HTTP/HTTPS traffic from VLAN10 to VLAN20, it will be covered in the later section
Configuring NAT on our management host to translate internal traffic
Let us do a stocktake of what we have did so far. Referencing the network diagram below, we have configured the interface of the firewall that connects to Lab Private. For the interface to Lab Internal and beyond, it is not configured yet. We will need to configure NAT on our managemnet host to allow the internal network to access the Internet.
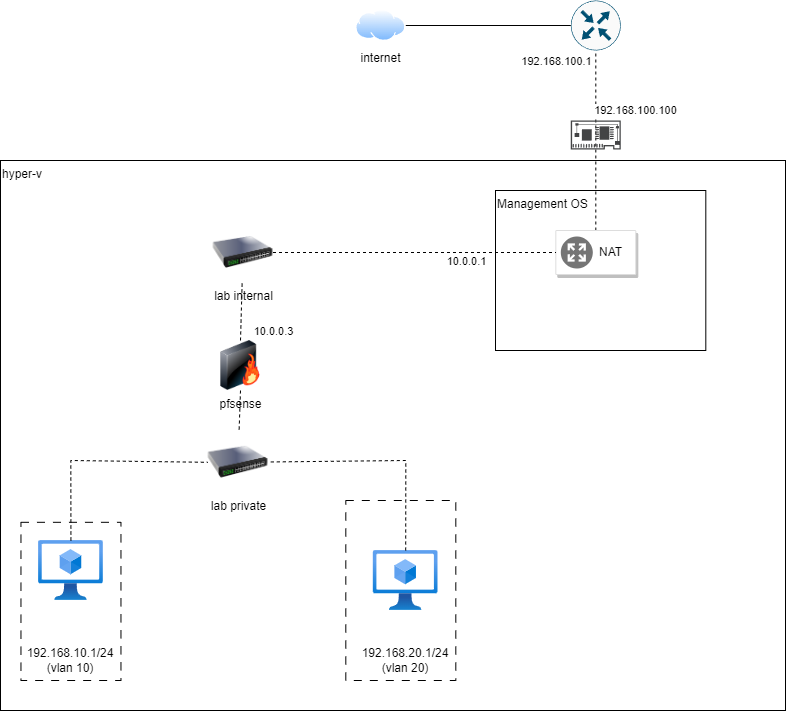
For the network
192.168.100.0/24network, it is the home network of our management host
As you can see, we have not configured the 10.0.0.0/24 network between the firewall and management host. So we will start with this step.
Set IP address on management host’s interface to Lab Internal
We will first assign a static IP address on the inteface to Firewall on our management host.
- On the management host, start a powershell as administrator.
- Run the following command to retrieve the interface index of the network adapter connected to the
Lab Internalswitch created in Part 1. Note the value ofifIndex.1
Get-NetAdapter -Name "vEthernet (Lab Internal)" | select ifindex

- Next, assign a static IP address to this interface with the following command after replacing the
ifIndexretrieved from step 2. In my case, the value is22.1
New-NetIPAddress -InterfaceIndex <ifIndex> -IPAddress 10.0.0.1 -PrefixLength 24
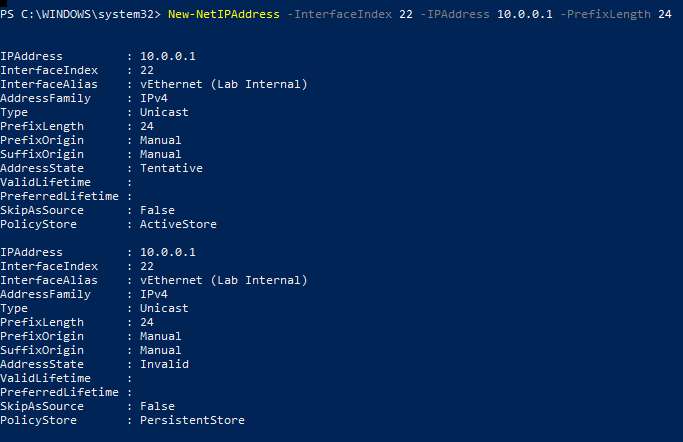
- Run
ipconfigcommand and we can see that the IP address has been set.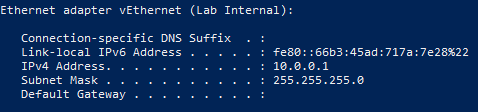
Set IP address on firewall’s interface to Lab Internal
We will now set an IP address on the Firewall interface to Lab Internal. This interface is also the WAN port on our Firewall.
- Back to the
Windows 10 (vlan10)client, access the web configurator and go to Interfaces > WAN. - Modify the configurations to be as the settings below:
- Enable: Check Enable Interface
- IPv4 Configuration Type: Static IPv4
- IPv6 Configuration Type: None
- IPv4 Address: 10.0.0.3/24
- IPv4 Upstream Gateway: Add a new gateway with settings below.
1
2
3

 Default: Checked "Default Gateway"
 Gateway Name: WANGW
 Gateway IPv4: 10.0.0.1
- Click Add to add the gateway followed by Save to update the interface.
- Click on Apply to apply the configurations.
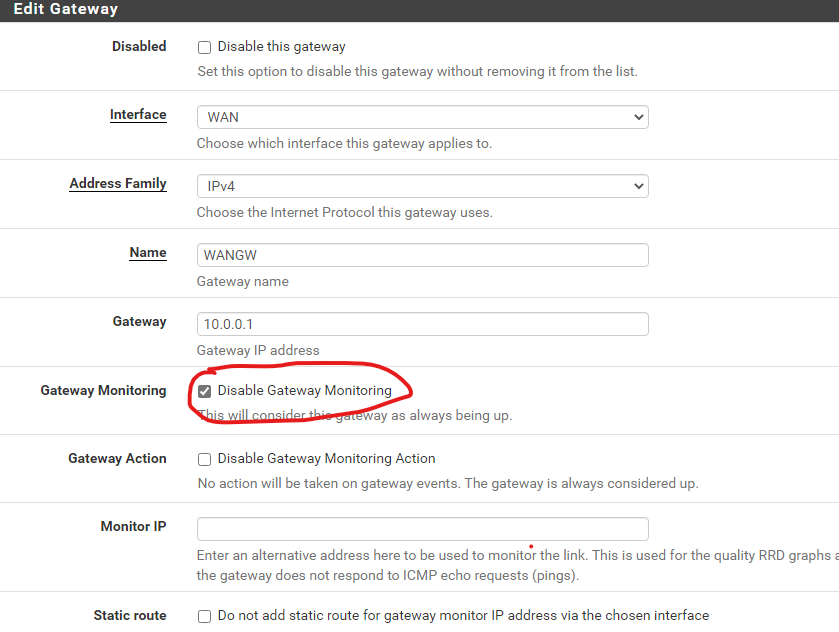
Disabling Gateway Monitoring
pfsense allow gateway monitoring to switch between gateways in the event that a gateway has failed. However, we do not need this in our homelab setup. Thus, we will be disabling this feature. This configuration would prevent the firewall from continuously pinging our management host.
- Go to System > Routing.
- In the Gateways tab, look for the gateway you created previously and click on the edit icon on the last column.
- Scroll down to
Gateway Monitoringand check theDisable Gateway Monitoring. - Save and apply the configurations.
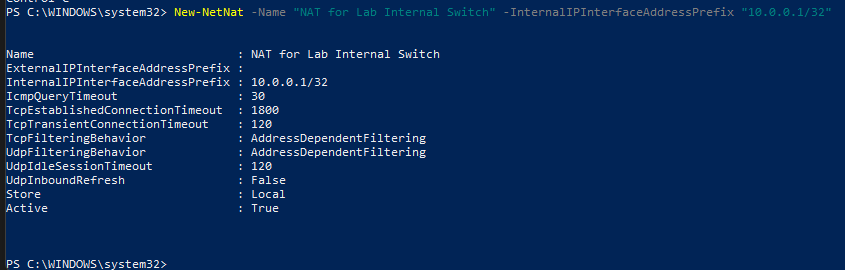
Adding NAT on management host
Next, we will add a NAT on the host so that traffic coming from the firewall can be translated and share the management host IP address. This would allow internal clients to access Internet. Do note that the management host should already have Internet access.
- Open a powershell as administrator and run the following command.
1

 New-NetNat -Name "NAT for Lab Internal Switch" -InternalIPInterfaceAddressPrefix "10.0.0.1/32"
-
Then, go back to
Firewallconsole and try to ping www.google.com. You should be able to do it. If not, wait for awhile and try again.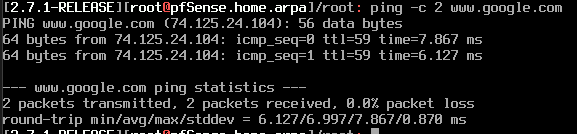
Adding firewall rules to allow clients in specific VLANs (VLAN 10) to access the internet
Next, we will add firewall rules to allow VLAN10 clients to access Internet via HTTP/HTTPS traffic. To access a website on the Internet e.g. www.google.com, we would need to allow clients in VLAN10 to make DNS query to Firewall and allowing HTTP/HTTPS traffic out.
To do so, we will add 1 alias and 2 rules to allow HTTP/HTTPS to anywhere and DNS traffic to only the local IP.
- In the pfsense web configurator, go to Firewall > Aliases. Click on Add. Create an alias with the following settings
1
2
3
4

 Name: web_traffic
 Description: alias for web traffic
 Type: Port(s)
 Port(s): 80, 443
- Save and apply the changes.
- Go to Firewall > Rules > OPT1.
- Click any of the Add button to add a firewall rule with the following settings to allow HTTP/HTTPS to anywhere
1
2
3
4
5
6

 Action: Pass
 Interface: OPT1
 Protocol: TCP
 Source: OPT1 Subnets
 Destination: Any
 Destination Port Range: Fill in `web_traffic` in the first `Custom` text field
Do also note that this rule would allow HTTP traffic to
Firewalland any network/host reachable by the management OS.As we are allowing web traffic to OPT2 network, the above rule would also allow web traffic to OPT2 network. Since this rule allows web traffic to
Firewall, we can also delete the previously created rule for accessing the webconfigurator by clicking on the trash icon on the right.
- Click on Save to save to add the rule.
- Click any of the Add button to add a firewall rule with the following settings to allow DNS traffic to
Firewall.1 2 3 4 5 6
Action: Pass Interface: OPT1 Protocol: TCP/UDP Source: OPT1 Subnets Destination: OPT1 Address Destination Port Range: Select DNS(53) from dropdown
Click on Save to add the rule.
- Apply the configurations. You should be able to access websites on the internet now from the
Windows 10 (vlan10)client or any clients from VLAN10 right now.
Restricting access to anywhere for VLAN20 clients
If you have guessed that VLAN20 clients were not able to access anywhere, you are correct! Thus, there would be nothing to configure in this section.
This is due to the implicit deny behaviour in pfsense firewall. If there were no rules defined for permitting traffic to flow through, it would be implicitly deny. (Deny by default)
Conclusion
We have finish configuring a basic setup for our virtual home lab with Hyper-V.
Just to recap, the way this network was design is so that we can spin up new VMs in the VLAN20 for untrusted VMs. In This can be VM images downloaded from VulnHub, or even create a FlareVM instance for performing malware analysis in VLAN20. In VLAN10, we can create trusted VM such as a Kali/Parrot VM that can be use to reach VLAN10. At the same time, allow HTTP/HTTPS connection to the internet.
That’s it! If you have read through all the way till now, thank you for your time and attention! ![]() I hope you had a great time here!
I hope you had a great time here!
Do remember to change your default password on your firewall!